Great news, MythTV now works on FireTV. I have tested this with all versions of FireTV hardware except the original version (i don’t have this one) and they work to different degrees. You should stay clear of wireless and hard wire in to ensure no issues occur. The new 4k stick definitely shows its hardware prowess here. I also can’t complain about the second gen FireTV. Get all the details at the link below.
Author Archives: Lance
SCCM Updates Supersedence
here is a quick and simple SQL query to determine what updates supersede and update.
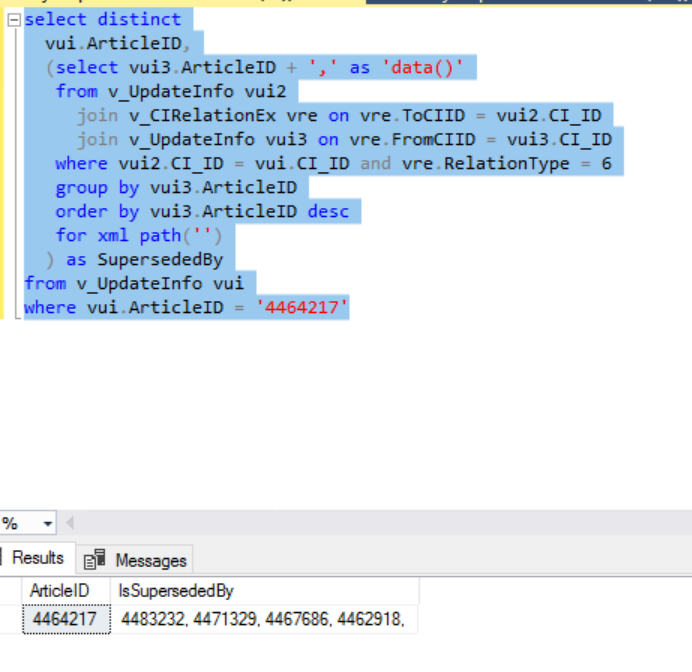
Here is the code, just replace the articleID in the where statement with the update you want to look at.
select distinct
vui.ArticleID,
(select vui3.ArticleID + ',' as 'data()'
from v_UpdateInfo vui2
join v_CIRelationEx vre on vre.ToCIID = vui2.CI_ID
join v_UpdateInfo vui3 on vre.FromCIID = vui3.CI_ID
where vui2.CI_ID = vui.CI_ID and vre.RelationType = 6
group by vui3.ArticleID
order by vui3.ArticleID desc
for xml path('')
) as SupersededBy
from v_UpdateInfo vui
where vui.ArticleID = '4464217'
Bacon Wrapped Chicken Bites…..
Oh Bacon how I love you!
These delectable delights can be used for just about any occasion. Bacon wrapped chicken bites! The best part is you can garnish them with anything

- Two skinless chicken breasts and a slab of bacon are all you need.
- Slice that chick in to small cubes, dont make them to big or they wont be bites anymore. Finger tip size is about right.
- You should be able to wrap the chick in about a 1/3rd section of a bacon strip. If you cant the chicken is probably too big to be a bite. I love bacon so i actually wrap mine in a half a strip 🙂
- Stick a toothpick through them to hold them together. notice in the picture above how there is like a little cup at the top. You’ll want this later.
- Once you have them made up, place them on a cookie sheet individually and freeze them, yes freeze them.
- Once they are frozen you can take them out and put them in a container for the next days festivities or cook them right away.
- To cook them, place them on a cookie sheet or similar sheet and cook them between 350 and 400. Temp depends on how you oven does for cooking bacon. Be careful here or you will burn the top of the bacon.
- Be aware that when i pull these out of the freezer and cook them, they do cook thoroughly as you have to cook at a higher temp than normal for chicken and the frozen state prevents the chicken from drying out during the cooking process. Again, experiment, results maybe different for you.
- After about 30 minutes or so. (again this depends on your oven) take them out and they should look like this……

Doesn’t that look good?
You can add some Garnish of some sort here. I like to add BBQ sauce or a brown sugar/chilli powder mixture (1 cup brown sugar, 1-2 tsp chilli powder). you can play with the chilli powder ratio to find the right mixture you like. To drop some sugar mixture on the top use a melon baller to to create a tight back of sugar in a small ball and drop it on top of the chicken bite. I prefer the OXO melon baller as it has two sizes. I use the small side for this application. The BBQ sauce is very straight forward, put some on the chicken bite and they should look something like this…..
 Light brown topping = brown sugar mixture, dark brown = BBQ sauce
And after another 10-15 minutes under some heat this comes out…

Doesn’t that look tasty? 🙂
Enabling Flash on Ubuntu Chromium
I am surprised that there is no flash capability in chromium to start out with in Mythbuntu. after some digging around I figured out how to install it. To start Follow the instructions in the Ubuntu wiki. Once you have done that, you need to enable it in Chromium itself as some of it is disabled.
- Open Chromium and type “chrome://gpu” in the url box.
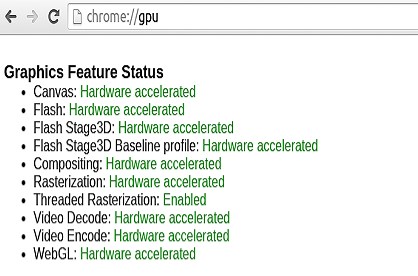
- If it does not look like this then its not fully enabled and you will see some entries listed as software only or partial software/hardware accelerated
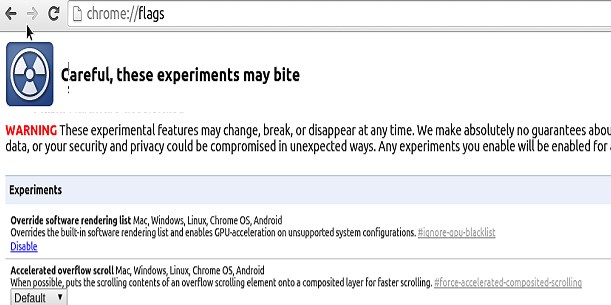
- To force Hardware acceleration open up a new tab and type in “chrome://flags”
- find the entry that says “Override software rendering list” and enable it. Then close and reopen the browser
- Now go back to the “chrome://gpu page and it should show everything set to Hardware accelerated.
You should be set to go. ESPN, Youtube should all play videos using hardware acceleration now (assuming you installed your graphics driver correctly).
Zotac Pico Thoughts
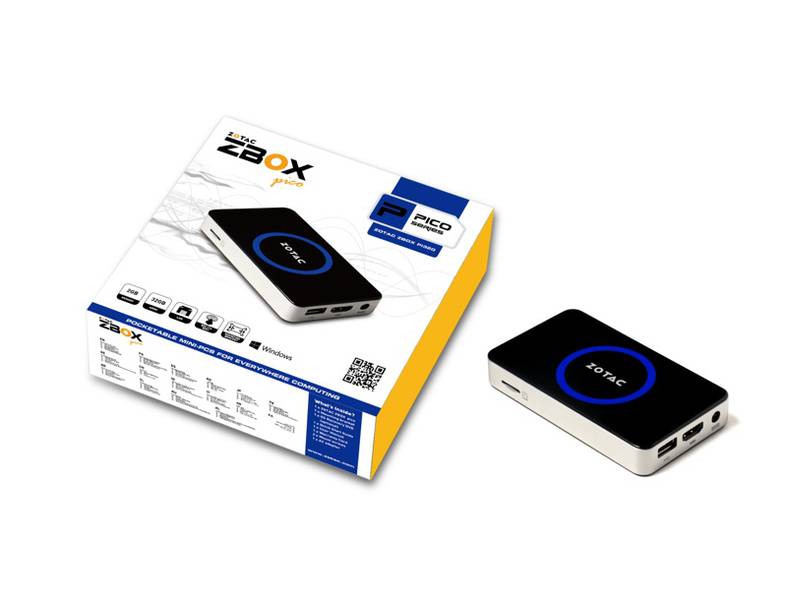
So a few months back I was really excited to see some Desktop PC’s come out using the BayTrail. In paticular I saw the Zotac Pico and the Minix z64 as pretty good starts to using ultra low power x86 SOC’s desktop computers. When the Pico became available I jumped on the chance to get one. What I learned is this thing is full of flaws.
- Runs extremely hot. Especially on the silver side band
- Supposed to have a SDP of 2.2w but under no circumstance does it get below 3.8w
- Running XBMC it uses 8watts of power??? That’s 3 watts more than the LIVA.
- Even after turning off the Zotac case lighting, you still are in the high 6 watts.
- Ethernet adapter is really a USB to ethernet adapter (HUH????)
- Ethernet adapter does not work with linux, at least i couldnt find any drivers for the ethernet adapter
- No USB 3.0, not a biggie but when your loading the OS, it makes things a lot quicker.
To my dismay, I sent this back for a refund. The Minix z64 is still in limbo and while the LIVA is only a dual-core cpu, it still handles all my MythTV requirements with little problem. I can play a H.264 DTS-MA video at 10mbit rate without any hiccups. Hopefully when the Braswell platform comes out they will be able to address all the flaws and add in simple things like an ethernet port and stop trying to gimmick the public with “Scenario Design Power”.
SCCM Web Service for Machine Variables 1.0
So I have been playing around with setting up an OpenStack implementation and wanted to automate the deployment of operating systems. The first thing that came to mind is that the default hyper-visor is Linux KVM which obviously is on the Linux operating system. What I needed to do is pre-populate some Machine variables that SCCM could use to select the correct OS, PC Name, Networking Speed, AV install, etc and just boot the machine and everything would be zero touch. My first implementation was a powershell script that used the SCCM powershell module to connect to our SCCM primary and add those variables. The problem I ran into is that since I am supporting OSD on a Non-Windows platform, I needed some other way besides powershell. I am already a user and Fan of Maik Koster’s Deployment Web service. I already knew that Maik had not written any methods for the machine variables in his service. So I searched around on the internet to see if anyone had picked this request up and to my surprise, no one had written this one up.
Now Maik’s Service is written in VB Language but I haven’t coded in VB in at least 15 years. So I decided to attempt to write a service in C# since that is what I have been working with the past 6 years. Web services are pretty much standard coding except for the data you are querying. After a ton of Cheetos, Doritos, Root-beer, Sierra Mist, ho-hos, Christmas Tree Cakes, Santa Brownies, and red velvet Christmas tree cakes I created this….
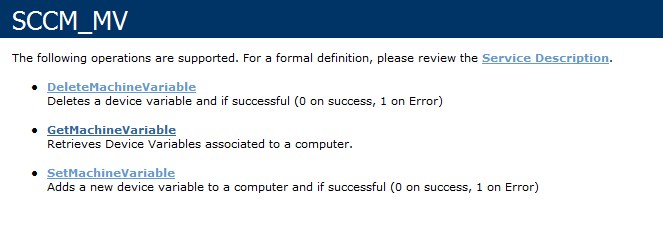
I have created 3 methods to use, DeleteMachineVariable, GetMachineVariable, and SetMachineVariable. The Get and Set Machine Variables are pretty straight forward, they will return 0 for success and a 1 for failure. For the GetMachineVariable method I added all three parts of the variable. These are the Name, Value, and IsMasked. The IsMasked field accepts $true or $false. In the screenshot below you can see some powershell calls to retrieve results from the web service.
 The results of those commands are show in the console output and can be used in anyway you use normal powershell code.

In the results screenshot you can see that there is a variable with a IsMasked that is set to True and the Value for that variable is empty. this seems to be by design. I’m not sure why you would want to use a Masked variable but if you do just know that its not readable by the web service for the value information.
This web service is intended to be an supplement to Maik’s web service. If you want to submit machine variables from the client, you will have to first call GetResourceID method in Maik’s web service to get that resourceID associated with the MAC address of the client.
Setting the web service up is the same as Maik’s and even the logging folder is similar. you will have to modify the Web.config file and change the SiteServer, SiteCode, ADAccount, and ADPassword settings to access your SCCM Primary or CAS. I run a CAS and three primaries and have the web service pointed at the CAS and it works just fine with replication. You could install the web service on each Primary if you like. Additionally, this web service is written in .NET 4.0. You may ask why 4.0 and not 3.0/2.0? The answer is simple, SCCM 2012 R2 is leveraging .NET 4.0 and I wanted to keep things consistent. Besides, who wants to use tech almost 10 years ago…..
Maik’s website
Maik’s Web Service on CodePlex
Download: SCCM_MV
ECS LIVA Setup Part 4
DHCP issues
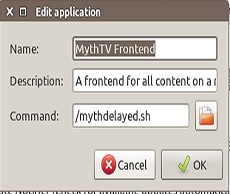
My last problem is related to the way DHCP is handled with ubuntu. Now I could have disabled DHCP and just set everything static but I reload my frontends on a regular basis so I didn’t want to do that every time I setup a frontend. Instead I have created a script to start mythtv after a 10 second delay.
- Create script on the root of the filesystem named mythdelayed.sh
- Use the following Content
- #start mythtv in a delayed state because of slow ubuntu dhcp networking
- sleep 10
- mythfrontend –service
- Change the default mythtv startup entry
- Modify the entry to run the mythdelayed.sh script.
- Restart and it should auto launch after 10 seconds and you should be up and running. This concludes my LIVA setup postings. The next step is to configure Mythtv settings which I will leave up to you……
ECS LIVA Setup Part 1
ECS LIVA Setup Part 2
ECS LIVA Setup Part 3
ECS LIVA Setup Part 3
Monitory Disconnect/Re-connect Issue
So when i first got the LIVA i was not impressed with it at all. It did not work as I expected it to and felt I got ripped off. Needless to say after figuring out a few tweaks those problems are now gone. Today i will show you the first one that is the most painful.
To give you some background, I have loaded the Intel Graphics driver fine according to Intel’s support page. the problem I ran into is that every time I turned my TV off the HDMI connection would drop and when I turned the TV back on it would show in the logs as reconnected but the TV would still show no input. After trying several different TV’s and Computer monitors I gave up for a few months. One nite i decided to look again and here is what i came up with for a solution.
- cd to the top of the filesystem ( / )
- Create a new monitor-hdmi.sh script
- sudo vi monitor-hdmi.sh
- Paste in the follow text. (don’t add the numbers 1-9)
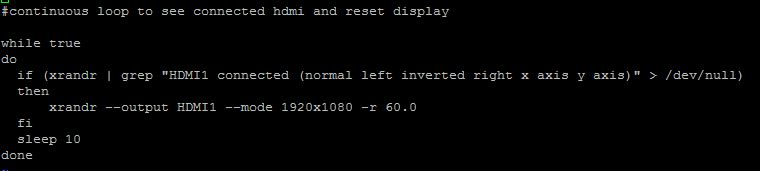
- #cont loop to see connected hdmi and reset display
- while true
- do
- if (xrandr | grep “HDMI1 connected (normal left inverted right x axis y axis)” > /dev/null)
- then
- xrandr –output HDMI1 –mode 1920×1080 -r 60.0
- fi
- sleep 10
- done
- Save the file and then “chmod +X monitor-hdmi.sh”
- additionally you need to set permissions with “chmod 777 monitor-hdmi.sh”
- If the monitor is not a 1080p monitor the resolution will change in step 2.2. for samsung 720p monitors its 1360×768
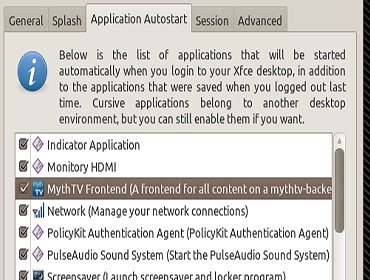
- Add the script to Session startup/App Autostart so that it starts at auto login.
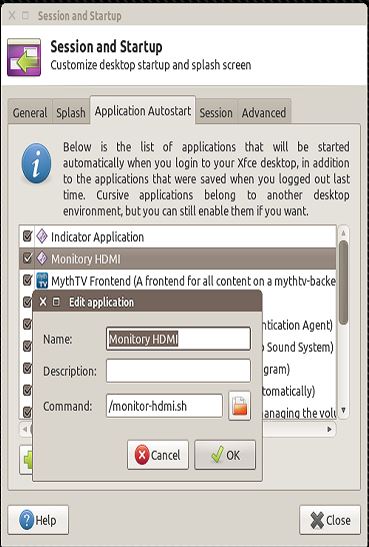
- Now reboot and when you turn off your tv and turn it back on it should reconnect and show the HDMI output.
ECS LIVA Setup Part 1
ECS LIVA Setup Part 2
ECS LIVA Setup Part 4
#cont loop to see connected hdmi and reset display
while true
do
if (xrandr | grep "HDMI1 connected (normal left inverted right x axis y axis)" > /dev/null)
then
xrandr --output HDMI1 --mode 1920x1080 -r 60.0
fi
sleep 10
done
ECS LIVA Setup Part 2
- Download the Mythbuntu ISO
- Format USB stick using the following settings for Rufus
- Make sure you load the ISO first and then check the settings
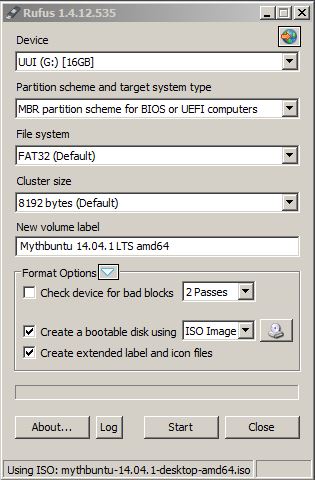
- Make sure you load the ISO first and then check the settings
- Once the USB stick is done, boot the LIVA off of it and install Mythbuntu using the onscreen instructions.
- Install PackageKit so you can install the Intel Linux Graphics Installer.
- Sudo apt-get install packagekit
- Download the Intel Linux Graphics Installer.
- Run the DEB file and wait for it to finish installing.
- After it has been installed, now you can actually download the drivers and have them configured. Find the Intel Graphics Installer in the menu like the screenshot below.
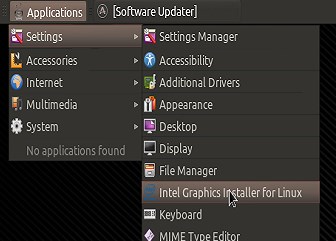
- Run the installer and wait, this process takes some time and will likely prompt you for a reboot at the end and it won’t reboot so you will have to manually reboot.
- I don’t use the wireless card that comes with the PC but if you want to us it, you have to do some funky stuff to make it work as it doesn’t work out of the box with mytbuntu (or any ubuntu version from what i hear). You can find more info about that here (steps 1-6).
This concludes Part 2, you should now have a fully functional ubuntu pc. Next part i will give you some stuff to tweak a few quirks with Intel and DHCP networking.
ECS LIVA Setup Part 1
ECS LIVA Setup Part 3
ECS LIVA Setup Part 4
ECS LIVA Setup Part 1
Introduction
 I have had this PC since it came out in July and thought i should do a writeup to share my thoughts and how to set it up. ECS has managed to create a nice x86 PC where others have failed with a nice CPU, Video, and Price features. I run Mythbuntu on all 3 of my LIVA’s. I have tried Windows 8.1 on one of them and it does pretty well even though the LIVA only features 32GB hard drive and 2GB ram for the version I have.
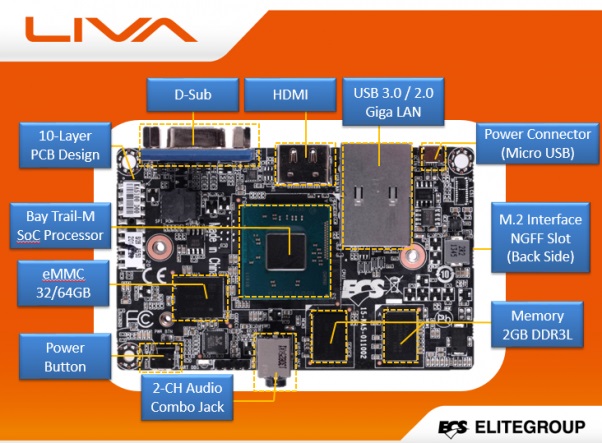 All versions of the LIVA are the same except for the hard drive storage which comes in 32GB and 64GB configurations. Feature wise you will find all the latest and greatest connectors on this mini pc. The USB 3.0 connector is a welcome upgrade that you wont find on any of the BayTrail Tablet Chip offerings such as the Zotac Pico. While I do like the fact it has a Gbit ethernet adapter on it, for the purpose of a MythTV frontend its not really needed. In the Next few posts I will show you how to install Mythbuntu and get it ready to watch movies and television.
ECS LIVA Setup Part 2
ECS LIVA Setup Part 3
ECS LIVA Setup Part 4